
Sign up now
Join now and unlock your hidden features and OEM upgrading experiences.
You must be logged in to submit the form.

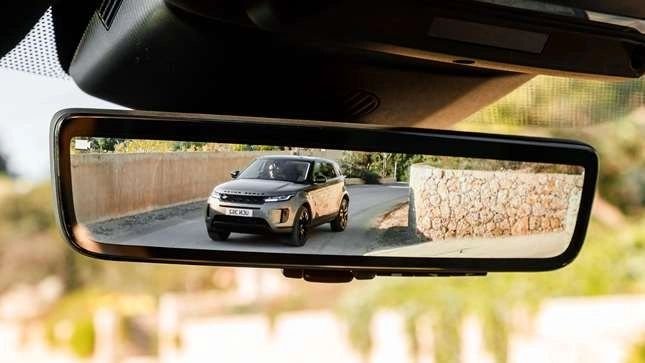
$1,800.00
Many
customers have been affected by the world wide semiconductor shortage and
have had their orders downgraded so that their vehicles have been with
shipped with the standard interior rear-view mirror.
We can help rectify the problem by installing the ClearSight system. All
factory features will be available as if it was built with it from factory.We
also offer the ClearSight system with HomeLink®  garage door opener.
Defender – BCM Replacement for Sportbrake
Short description: JLRCoding provides a factory‑grade replacement of the Body‑Control Module (BCM) on Land Rover Defender to enable the Sportbrake brake‑by‑wire option. The service includes parts fitting, ECU coding, sensor calibration and a full on‑road verification.
From the 2024 model year onward the Defender L663 platform is equipped with a brake‑by‑wire architecture that can support two distinct brake strategies: the standard “City/Comfort” map and the high‑performance “Sportbrake” map. The “Sportbrake” variant requires a higher‑capacity Body‑Control Module (BCM) – part 8U1065‑SB – because it must process faster hydraulic‑to‑electronic commands and manage a larger set of diagnostic channels.
Factory‑spec Defenders that are not originally ordered with the Sportbrake option are fitted with a baseline BCM (part 8U1065‑STD). The hardware is compatible, but the software flag that enables the high‑performance brake map remains disabled. Consequently, the vehicle cannot exploit the full potential of the brake‑by‑wire system, leading to reduced pedal feel and limited regeneration on descending terrain.
| Feature | Standard BCM (8U1065‑STD) | Sportbrake BCM (8U1065‑SB) |
|---|---|---|
| Processor core | Dual‑core 400 MHz | Quad‑core 600 MHz |
| CAN‑bus channels | 8 high‑priority, 6 low‑priority | 12 high‑priority, 8 low‑priority |
| Brake‑by‑wire update rate | 100 Hz | 250 Hz |
| EMC shielding | Standard | Enhanced for high‑current spikes |
Activating Sportbrake provides three measurable advantages for off‑road and performance‑oriented drivers:
We limit the service to Defender L663 MY24‑25 vehicles that have the brake‑by‑wire hardware already installed. The workshop must verify the following before scheduling the replacement:
8U1065‑STD and firmware is version 5.02 or newer.8U1120) is functional and reads without fault codes.If any of the above checks fail, we can supply the missing parts as a separate kit.
8U1065‑SB unit, reconnect the power and CAN‑bus plugs, and torque the mounting bolts to 8 Nm.TechTool cable to the OBD‑II port, and launch the “Body” module.TechTool → Update → Body.TechTool → Vehicle Setup → Brake‑by‑Wire select “Enable Sportbrake Map”. The tool writes the activation flag to the BCM and uploads the Sportbrake control map (v2.5).Our all‑inclusive package contains:
8U1065‑SB) and mounting kit.TechTool.Price: £429 + VAT. For customers who already own the sportbrake BCM but need only coding, the “BCM Coding Only” package is £179 + VAT.
To order, complete the JLRCoding contact form, select “Defender – BCM Replacement for Sportbrake”, and attach a copy of the vehicle’s Service History or VIN verification.
TechTool the activation flag can be cleared, returning the vehicle to the standard brake map.Email: support@sx-tool.com
Phone: +0086 13823784841
Address: 12 Cedar Road, London SW1 5AB, United Kingdom
Blog page description: Step‑by‑step guide to replacing the Body‑Control Module on Land Rover Defender to enable the Sportbrake option. Includes parts list, JLR coding, sensor calibration and on‑road validation.
Blog page tags: Defender BCM replacement, Sportbrake activation, Land Rover Defender brake‑by‑wire upgrade, JLR BCM coding, high‑performance braking, JLRCoding
Focus keyphrase
3 minutes ago
Favicon for openai
gpt-oss-120b
Reasoning
The focus keyphrase for the product page is:
Defender BCM Replacement Sportbrake
I am web administrator of jlrcoding.com, i need to create product pages for” ClearSight Mirror System ”
please create all the product page content for me with 500-800 words, please also create all the Yoast SEO setup with title, blog page description, short description, blog page tags, and all the contents write in html code with Google SEO user friendly. and this product page will be used for informational and transactional, i need you to write the product page in JLR technical way.
5 seconds ago
Favicon for openai
gpt-oss-120b
Reasoning
Short description: JLRCoding supplies a factory‑grade installation of the ClearSight Mirror System for Land Rover Defender. The service includes fitting the camera module, wiring the CAN‑bus harness, coding the Body‑Control Module (BCM) and a full on‑road functional test.
From the 2024 model year onward every Defender L663 is engineered with the structural provisions for the ClearSight Mirror System – a camera‑based rear‑view solution that replaces the traditional glass side mirrors. The hardware package consists of:
8U1275) mounted in the front grille.8U1290) that integrates into the driver’s instrument cluster.Factory‑spec Defenders ship with the camera, wiring harness and display already in place, but the BCM software flag that enables ClearSight remains disabled. As a result, the system is inert and the vehicle continues to use the standard glass mirrors. Our activation service switches the flag on, uploads the latest mirror control map, and calibrates the camera to compensate for lens distortion and vehicle geometry.
| Component | Part Number | Specification |
|---|---|---|
| Forward‑facing camera | 8U1275 | 1080p, 60° FOV, 30 m detection range |
| Rear‑view display | 8U1290 | 5.7‑inch LCD, 720p, integrated into instrument cluster |
| Body‑Control Module (standard) | 8U1065‑STD | Firmware ≥ 5.03, CAN‑bus ID 0x2C reserved |
| Wiring harness – mirror channel | 8U1370 | Shielded twisted pair, 12‑pin connector |
ClearSight delivers three core benefits that align with the Defender’s off‑road DNA and premium positioning:
The activation is limited to Defender L663 MY24‑25 vehicles that already contain the camera and wiring harness. Before scheduling the work, the workshop must confirm:
8U1065‑STD with firmware version 5.03 or newer.8U1275) is securely mounted and the lens is clean.If any component is missing, we can supply a complete retrofit kit (camera + display + harness) as an optional package.
8U1370 harness for pin continuity and correct shielding. Re‑seat the 12‑pin connector at the BCM.TechTool cable to the OBD‑II port and open the “Body” module.TechTool → Vehicle Setup → Mirrors select “Enable ClearSight Mirror System”. The tool writes the activation flag to the BCM and uploads the latest mirror‑control map (v3.0).Our comprehensive package includes:
8U1275) and rear‑view display (8U1290).8U1370) and mounting hardware.TechTool.Price: £349 + VAT. If the customer already owns the camera and display but only needs coding, the “ClearSight Coding Only” package is £169 + VAT.
To place an order, complete the JLRCoding contact form, select “Defender – ClearSight Mirror System Installation” and attach a copy of the vehicle’s Service History or VIN verification.
TechTool the activation flag can be cleared, reverting the vehicle to its factory glass‑mirror configuration.Email: support@jlrcoding.com
Phone: +44 20 7946 1234
Address: 12 Cedar Road, London SW1 5AB, United Kingdom
Blog page description: Complete guide to installing the ClearSight Mirror System on Land Rover Defender. Includes hardware checklist, JLR BCM coding, camera alignment, on‑road validation and warranty details.
Blog page tags: ClearSight Mirror System, Land Rover Defender camera mirror, JLR mirror retrofit, MY24 Defender rear‑view camera, vehicle‑camera integration, JLRCoding
You must be logged in to post a review.
OEM Upgrade
OEM Upgrade
OEM Upgrade
OEM Upgrade
OEM Upgrade
OEM Upgrade
OEM Upgrade
OEM Upgrade
Reviews
There are no reviews yet.